DIY: How to Change BMW GS Tires
Tubed or tubeless, adventure motorcycle tires have one thing in common: they’re often tough and hardy, and if you’ve ever wrestled a spoked wheel with an old, stiff adventure tire, you know the job isn’t...

Considering going from air tubes to bib mousses? You’ve come to the right place. As more and more riders switch over to a mousse tire insert, we’re sharing our insights, advice, and helpful tips on how to choose the right bib mousses for you, what’s the difference between tubes and mousses, how to pick the right size, and what mousse tire changer you’ll need.
Enduro mousse or motocross? What about mousse sizing and care? Michelin bib mousse or Nitromousse? Mousse tire changer or tire irons? In the blog post below, we’ll cover all this and more.
Read on to learn all there is about bib mousse inserts, when to use them, and how to properly install and look after them.
First things first: what exactly is a bib mousse? Commonly referred to as “mousse insert” or simply “mousse”, it’s a foam tire insert that works in place of a regular inner tube. Essentially, it’s a solid foam ring that holds a tire shape as well as – and often, better – than an air tube.
The mousse's foam consists of multiple closed-cell, honeycomb-shaped pockets. Each cell is filled with nitrogen gas supporting the overall structure of the mousse. Covering the outside of the mousse is a smooth skin-like coating that is designed to slide into a tire the same way a regular air tube does.
Because of its unique composite (if you want to get really nerdy, it’s made of butyl rubber foam), a bib mousse is just about impossible to puncture. This is one of the main advantages of using mousse tire inserts: no matter the terrain, you’ll never get a flat tire.
On the other hand, as a result of the mousse's solid structure, the only way to adjust the feel is by selecting a softer mousse. Unlike a regular air tube, where you can change the PSI for different riding environments, a bib mousse retains one feel all of the time (until it starts to deteriorate).
Bib mousses have a distinct ride feel about them, and it takes a little while to get used to it.
Typically, a bib mousse feels much softer than a regular air-filled tire. Then again, it all depends on the mousse’s size and hardness; some mousses may feel softer than others, and when they shrink, they produce a softer feel to them, too. Some riders say this “low-air” feeling translates into a “dead feel” when riding over bumps, hard terrain, and rocks as the tire sits slightly flatter; then again, this is precisely what creates more traction. Once you get to the softer feeling, however, few riders ever go back to air tubes: most European Motocross and Enduro GP riders swear by bib mousses and would likely have a tough time going back to air tubes.
In the US, some MX riders still favor the air tubes because under heavy cornering loads, using a bib mousse results in more sidewall rollover than an air tube. On the other hand, when the tracks are rough, the risk of getting a flat tire just isn’t worth it - after all the time, energy, and pain you’ve invested and the sponsor support you’ve gotten, failing because of a flat tire is just too costly.
Enduro and cross-county riders tend to benefit the most from bib mousse inserts. This is because of the unparalleled grip that a mousse lends you on terrain such as rocks, as well as the puncture-proof riding.
Avoiding flat tires is the number one reason to use mousses, but there’s more to it. Once you get used to how your tires feel with bib mousse inserts, you may actually prefer how it helps the tire grip.
Despite their resilience against flat tires and great grip, there are a few minor cons of using bib mousses: first, they’re are about a pound heavier than most heavy-duty air tubes. Second, mousse inserts are more expensive than regular tubes, and can be a bit of a pain to install – unless, that is, you have the right bib mousse-changing tools. Finally, bib mousses can deteriorate if you run them on the tarmac at high speeds.
Not all bib mousses are created equal: sizing, weight, and brands matter. More importantly, the softness is something to take into account - there are hard, soft, and super-soft mousses on the market.
Choosing the correct size mousse for your tire is the best way to make sure you get the best life possible out of it. For regular enduro riding, your mousse size should be matched exactly to your tire size – for example, a 120 mousse will work best in a 120 tire.
Pro tip: If you are a hobby rider simply enjoying trail riding with your buddies, and super-precise tire width is not an issue for your trail needs, start with the largest tire/mousse combination, for example, a 140 - 140 tire and mousse. After wearing out a few sets of 140 tires, the mousse shrinks in time. Now, you can switch to using 130 or 120 wide tires and the same mousse works perfectly size-wise. Note that with time, mousses shrink and become stiffer, decreasing the plush feel, but for the cost-conscious, reusing mousses can be an option.
For extreme enduro, some riders put a softer mousse into a bigger tire to have a softer overall feel. This is OK if you know what you are doing, however, it can damage your rim or allow mud and dirt into your tire which will in turn damage your mousse. Going by the manufacturer’s recommendation is another good way to get good performance if you aren't sure what you are looking for.
As mentioned before, it is typical for a bib mousse to weigh about a pound more than a standard heavy-duty motocross tube. You can find bib mousse inserts available in all sizes to suit small wheels all the way up to large wheels. It is typical for most companies to start at 18” for mousse inserts. However, there are a select few companies that do offer smaller sizes - X-Grip does sizes starting from 12”. Some riders cut down larger mousse inserts to fit smaller tires. This is generally not recommended but can work under the right circumstances.
Having invented mousse inserts in the 80s for the Paris-Dakar racers, Michelin is by far the most well-known mousse manufacturer out there. Boasting an impressive record of 36 victories in the Dakar since 1983, 22 world titles in Enduro, and 7 world titles in MX, Michelin’s bib mousses are some of the best products out there with a focus on longevity and robustness. The only drawback is the price - $160 to $240 depending on tire size.
Nitromousse is a serious contender for Michelin: one of the most popular brands in the US, Nitromousse promises a long lifespan and an excellent feel. Motocross riders claim Nitromousse lasts longer and offers a better feel than Michelin, and it has a more competitive price - around $135 per mousse, depending on size.
Airmousse is a Swedish mousse insert brand boasting a proprietary elastomer compound that makes the mousse tougher and longer lasting. In addition, Airmousse claims to have solved the “dead feel” issue by coming up with unique rubber components and a formula that “gives the mousse a low-pressure predictable ride, resistance to impacts, and increased bump absorption”. Airmousse offers motocross and enduro mousse inserts priced at $160.
Austrian-based X-Grip is another brand with a wide range of mousse selection starting from small sizes. Beloved by trail riders and RedBullRomaniacs pros alike, X-Grip offers a good intersection point on quality and price - their mousses cost around $130.
Most big tire brands (Dunlop, Michelin, and the like) also offer a selection of mousses.
There are a couple of different techniques to change a bib mousse. To install a bib mousse, use lube generously on the inside of the tire (but don’t lube the mousse itself!). Once you have pushed the clean and dry mousse inside the tire, you can add a little mousse gel on the visible part of the mousse. This way you avoid mousse gel getting on the bead of the tire, as it might cause the tire to spin on the wheel despite the rim lock.
Curved tire irons are best for mounting as they reduce the effort; remember that mousses last longer than tires, so if you’re putting an old mousse into a new tire, clean it with a cotton cloth before using it.
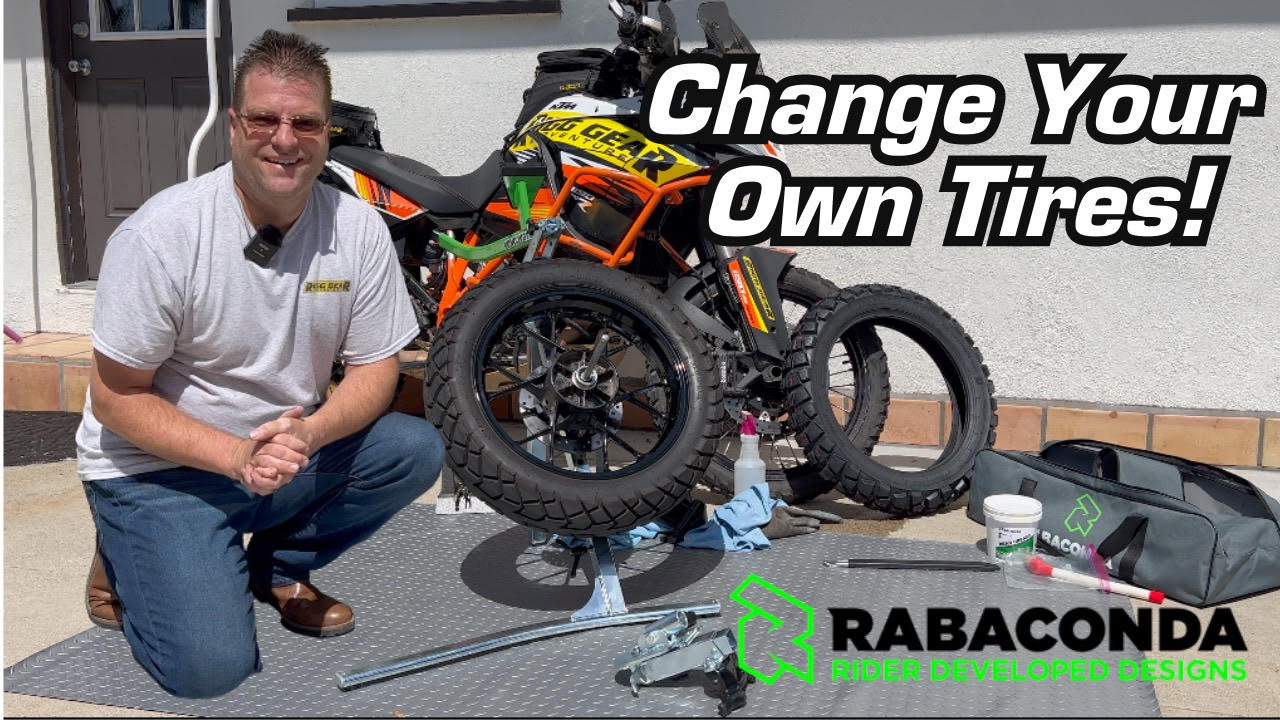
To change a bib mousse, it’s best to use the right tools for the job. Rabaconda 3-Minute Tire Changer was designed specifically for this purpose: changing bib mousses in dirt bike tires. Whether it’s enduro, motocross, trail riding, rally, or simply leisure dirt biking, the 3-Minute Tire Changer is the easiest and fastest way to change bib mousses.
Here is a simple, step-by-step video tutorial on how to change bib mousses in record time:
To start off, use soap water spray to remove any dirt that could potentially cause damage. Use the bead breaker to help you insert four or more tire irons around the tire with their straight end (not the curved end). Now, push your knee against the side of the tire that is opposite to the irons. Pull the irons towards you and one side of the tire's bead should start to pop over the rim.
Flip the wheel over so that it rests on the tire changing stand again. Use the bead breaker to push down on the tire right above where the bead started to pop off on the other side. The tire should now start to come off. Once the bead of the tire is off, keep turning the wheel and pressing the bead breaker to push down the rest of the tire (mousse). Once this is done, the tire is hanging on the upper bead that has not been dismounted yet. Pull the bead breaker as close to the rim as possible and find a good spot to push down the side over the rim to completely remove it. When it starts to come off, spin the wheel and use the bead breaker to push the tire all the way off until it falls down.
Tip: If the bead breaker starts slipping over the side of the tire when trying to push over the rim, keep turning and searching for a sweet spot where it finally gets the right grip and you can push the side down. If you have a rim lock, you can push the link on the Rabaconda bead breaker up so that it pushes over the rim lock to remove the rest of the tire.
A rim lock is recommended with a bib mousse as it prevents the tire from spinning on the rim. Most riders do not use one on the front as it is not a drive wheel. However, a rear wheel with a mousse in it should always have a rim lock. This is because the power is directed through the rear wheel. That force alone is enough to possibly cause the tire to spin on the rim (be sure not to get lube on the tire bead as it can also cause spin). The smaller a mousse is inside a tire, the more likely it is to spin. Some mousse companies do not specify that rim locks are needed, but it’s always better to be safe than sorry. In fact, some pros often use two rim locks on their rear wheels if they’re going with a very soft mousse for better grip!
It’s entirely possible to change bib mousses with nothing but tire irons – that is, if you’re an experienced and highly skilled professional. Mousses are notoriously tricky to change, but the good news is, you don’t need to be a pro to change mousses like one as long as you’ve got the right tools.
Rabaconda’s 3-Minute Tire Changer allows riders with zero mechanical skills to change bib mousses fast, efficiently, and with minimal effort. Favored by motocross, enduro, and rally racers as well as everyday riders and weekend warriors, the 3-Minute Tire Changer is all you need for your garage. It has three solid standing points and a powerful bead breaker which eliminates all the huffing and puffing, and the tool is incredibly easy to master and use even if you’re new to changing tires with bib mousses.
Bonus: compact and easy to pack away, the 3-Minute Tire Changer can be thrown into a van for travel, races, and events.
Although mousses can outlast tires, they do require maintenance to prevent deterioration and stretching. It’s best to always clean your mousse after some period of riding so that the dirt and mud cannot deteriorate it. We know this can be a bit of a pain, but it’s especially important after muddy rides or before an extended period of time when you will not be riding. Cleaning your mousses will ensure that they’re not broken down by anything but pure dirt bike riding.
Another important thing to take into consideration is the storage temperature of your bib mousse. A bib mousse will typically start to expand at temperatures above 30 degrees Celsius / 86 degrees Fahrenheit, so it’s best to keep them stored in an air-conditioned or generally cooler room.
It is hard to say exactly how long a bib mousse will last because it is greatly dependent on the rider, the riding conditions, and the maintenance of the mousse. In extreme cases it can go from days to 100+ hours.
Think about what you will expose your mousse to when estimating how long it will last. For example, mousse tires do not like being ridden on roads at constant high speeds. The extra friction will cause them to heat up and start to deteriorate more quickly than usual. A mousse should be replaced as soon as the tire starts to feel too soft - paradoxically, mousses harden with time as they shrink giving that deflated, “dead” tire feel. If you’re taking a pause from riding, dismount your mousse and clean it as dirt and mud will cause it to deteriorate over time; in addition, mousses tend to shrink with time.
Remember, switching from a regular air tube to a bib mousse will create a totally different tire feel. This takes some getting used to, so put a good few rides on them before you decide if you like it. Don’t forget to keep your mousse inserts clean, well-lubed, and out of the heat in order to prolong their life as much as possible.
Riding with bib mousses means saying goodbye to flat tires - but it’s also about better bump absorption, less potential rim damage when you hit sharp rocks, and better grip. Finally, changing mousse inserts with the Rabaconda 3-Minute Tire Changer is actually easier than changing air tubes, plus you’ll bever have to hold up your friends or carry spare tubes, air pump, and tools to repair a flat tire out on the trails.
Enjoy your puncture-free riding!

0 comments